> ## Documentation Index
> Fetch the complete documentation index at: https://composio-27-feat-docs-revamp.mintlify.site/llms.txt
> Use this file to discover all available pages before exploring further.
# How To Configure Connections?
> Learn how to configure connections for your users
### What is an Integration?
Integrations in Composio are configuration objects that define how your application connects to external services (like GitHub, Slack, or HubSpot). Each integration encapsulates authentication credentials (OAuth Client ID/Secret), permission scopes, and API specifications that determine how your users can interact with the external service. These configuration objects are used to configure and manage connections with external services.
For example:
* When you create a GitHub integration, you specify OAuth authentication parameters and permission scopes like `repo:read`
* This integration then serves as a reusable template - any user connecting their GitHub account through this integration will have the same standardized access level and authentication flow
* This ensures consistent and secure access patterns across your entire user base
### Creating a New Integration
A single integration can be used by multiple users to connect their accounts. Ideally, create one integration per app unless you need different configurations for specific use cases.
1. Login at [Composio's Website](https://app.composio.dev)
2. Go to the Tools section
3. Click on any app you want to integrate
4. Click on Setup on \[App Name] Integration
5. Choose your integration name and click Save
You can create an integration using the SDK by following the steps below:
```python Python
from composio import ComposioToolSet
toolset = ComposioToolSet()
entity = toolset.get_entity("default")
```
```javascript JavaScript
import { Composio } from "composio-core";
const toolset = new Composio();
const entity = toolset.getEntity("default");
```
You need to provide the following parameters to create an integration:
* `name`: Name of the integration
* `app_id`: App ID of the integration, you can find it [here](https://docs.composio.dev/api-reference/apps/get-app)
* `auth_mode`: Authentication mode of the integration (e.g., OAUTH2, OAUTH1, API\_KEY, BASIC, BEARER\_TOKEN)
* `use_composio_auth`: You can use the OAuth flow provided by Composio by setting this to `True` or use your own ClientID and ClientSecret by setting this to `False` & providing the fields as shown below
```python Python
# Using Composio's default OAuth flow
integration = entity.client.integrations.create(
name="GITHUB_Integration_Demo",
app_id="01e22f33-dc3f-46ae-b58d-050e4d2d1909",
auth_mode="OAUTH2",
use_composio_auth=True
)
# Using your own OAuth flow
integration = entity.client.integrations.create(
name="GITHUB_Integration_Demo",
app_id="01e22f33-dc3f-46ae-b58d-050e4d2d1909",
auth_mode="OAUTH2",
use_composio_auth=False,
auth_config={
"client_id": "",
"client_secret": ""
}
)
```
```javascript JavaScript
// Using Composio's default OAuth flow
const integration = await entity.integrations.create({
name: "GITHUB_Integration_Demo",
appId: "01e22f33-dc3f-46ae-b58d-050e4d2d1909",
authScheme: "OAUTH2",
useComposioAuth: true,
});
// Using your own OAuth flow
const integration = await entity.integrations.create({
name: "GITHUB_Integration_Demo",
appId: "01e22f33-dc3f-46ae-b58d-050e4d2d1909",
authScheme: "OAUTH2",
useComposioAuth: false,
authConfig: {
client_id: "",
client_secret: ""
}
});
```
Since the created integration uses OAuth, you need to redirect the user to the URL returned by the `redirectUrl` field in the response.
You can initiate a connection using the integration by following the steps below:
```python Python
request = entity.initiate_connection("GITHUB", redirect_url="https://yourwebsite.com/connection/success", integration=integration)
print(request.redirectUrl)
```
```javascript JavaScript
const request = await entity.initiateConnection({
appName: "github",
redirectUrl: "https://composio.dev",
integrationId: integration.id
});
console.log(request.redirectUrl)
```
### How to Fetch Integrations
```python Python
from composio import ComposioToolSet, App
toolset = ComposioToolSet()
# get all integrations
print(toolset.get_integrations())
#filter based on app
print(toolset.get_integrations(app=App.GMAIL))
#filter based on integration id
print(toolset.get_integration(id=""))
# By auth scheme
print(toolset.get_integrations(auth_scheme="BEARER_TOKEN"))
```
```javascript JavaScript
import { OpenAIToolSet } from "composio-core";
const openai_client = new OpenAIToolSet();
// //get all integrations
console.log(openai_client.client.integrations.list())
// //filter based on app
console.log(openai_client.client.integrations.get({ appName:'gmail'}))
// //filter based on integration id
console.log(await openai_client.client.integrations.get({integrationId:""}))
```
### Creating a new connection using an Integration
You can follow the same steps as mentioned in [Creating a new connection](/patterns/Auth/connected_account) and use integration object (Python) or integrationId (JavaScript).
```python Python
from composio import ComposioToolSet
toolset = ComposioToolSet(entity_id="default")
entity = toolset.get_entity()
integration = entity.client.integrations.get_by_id("integration_id...")
connection_request = entity.initiate_connection(
app_name="TWITTER",
redirect_url="https://yourwebsite.com/connection/success",
integration=integration,
)
# If the connection method is OAuth, redirect the user to the URL below
print(connection_request.redirectUrl)
```
```javascript JavaScript
import { OpenAIToolSet } from "composio-core";
const toolset = new OpenAIToolSet();
const connectionRequest = await toolset.client.connectedAccounts.initiate({
appName: "gmail",
redirect_url: "https://yourwebsite.com/connection/success",
integrationId: integration.id,
entityId:"default"
});
console.log(connectionRequest.redirectUrl);
```
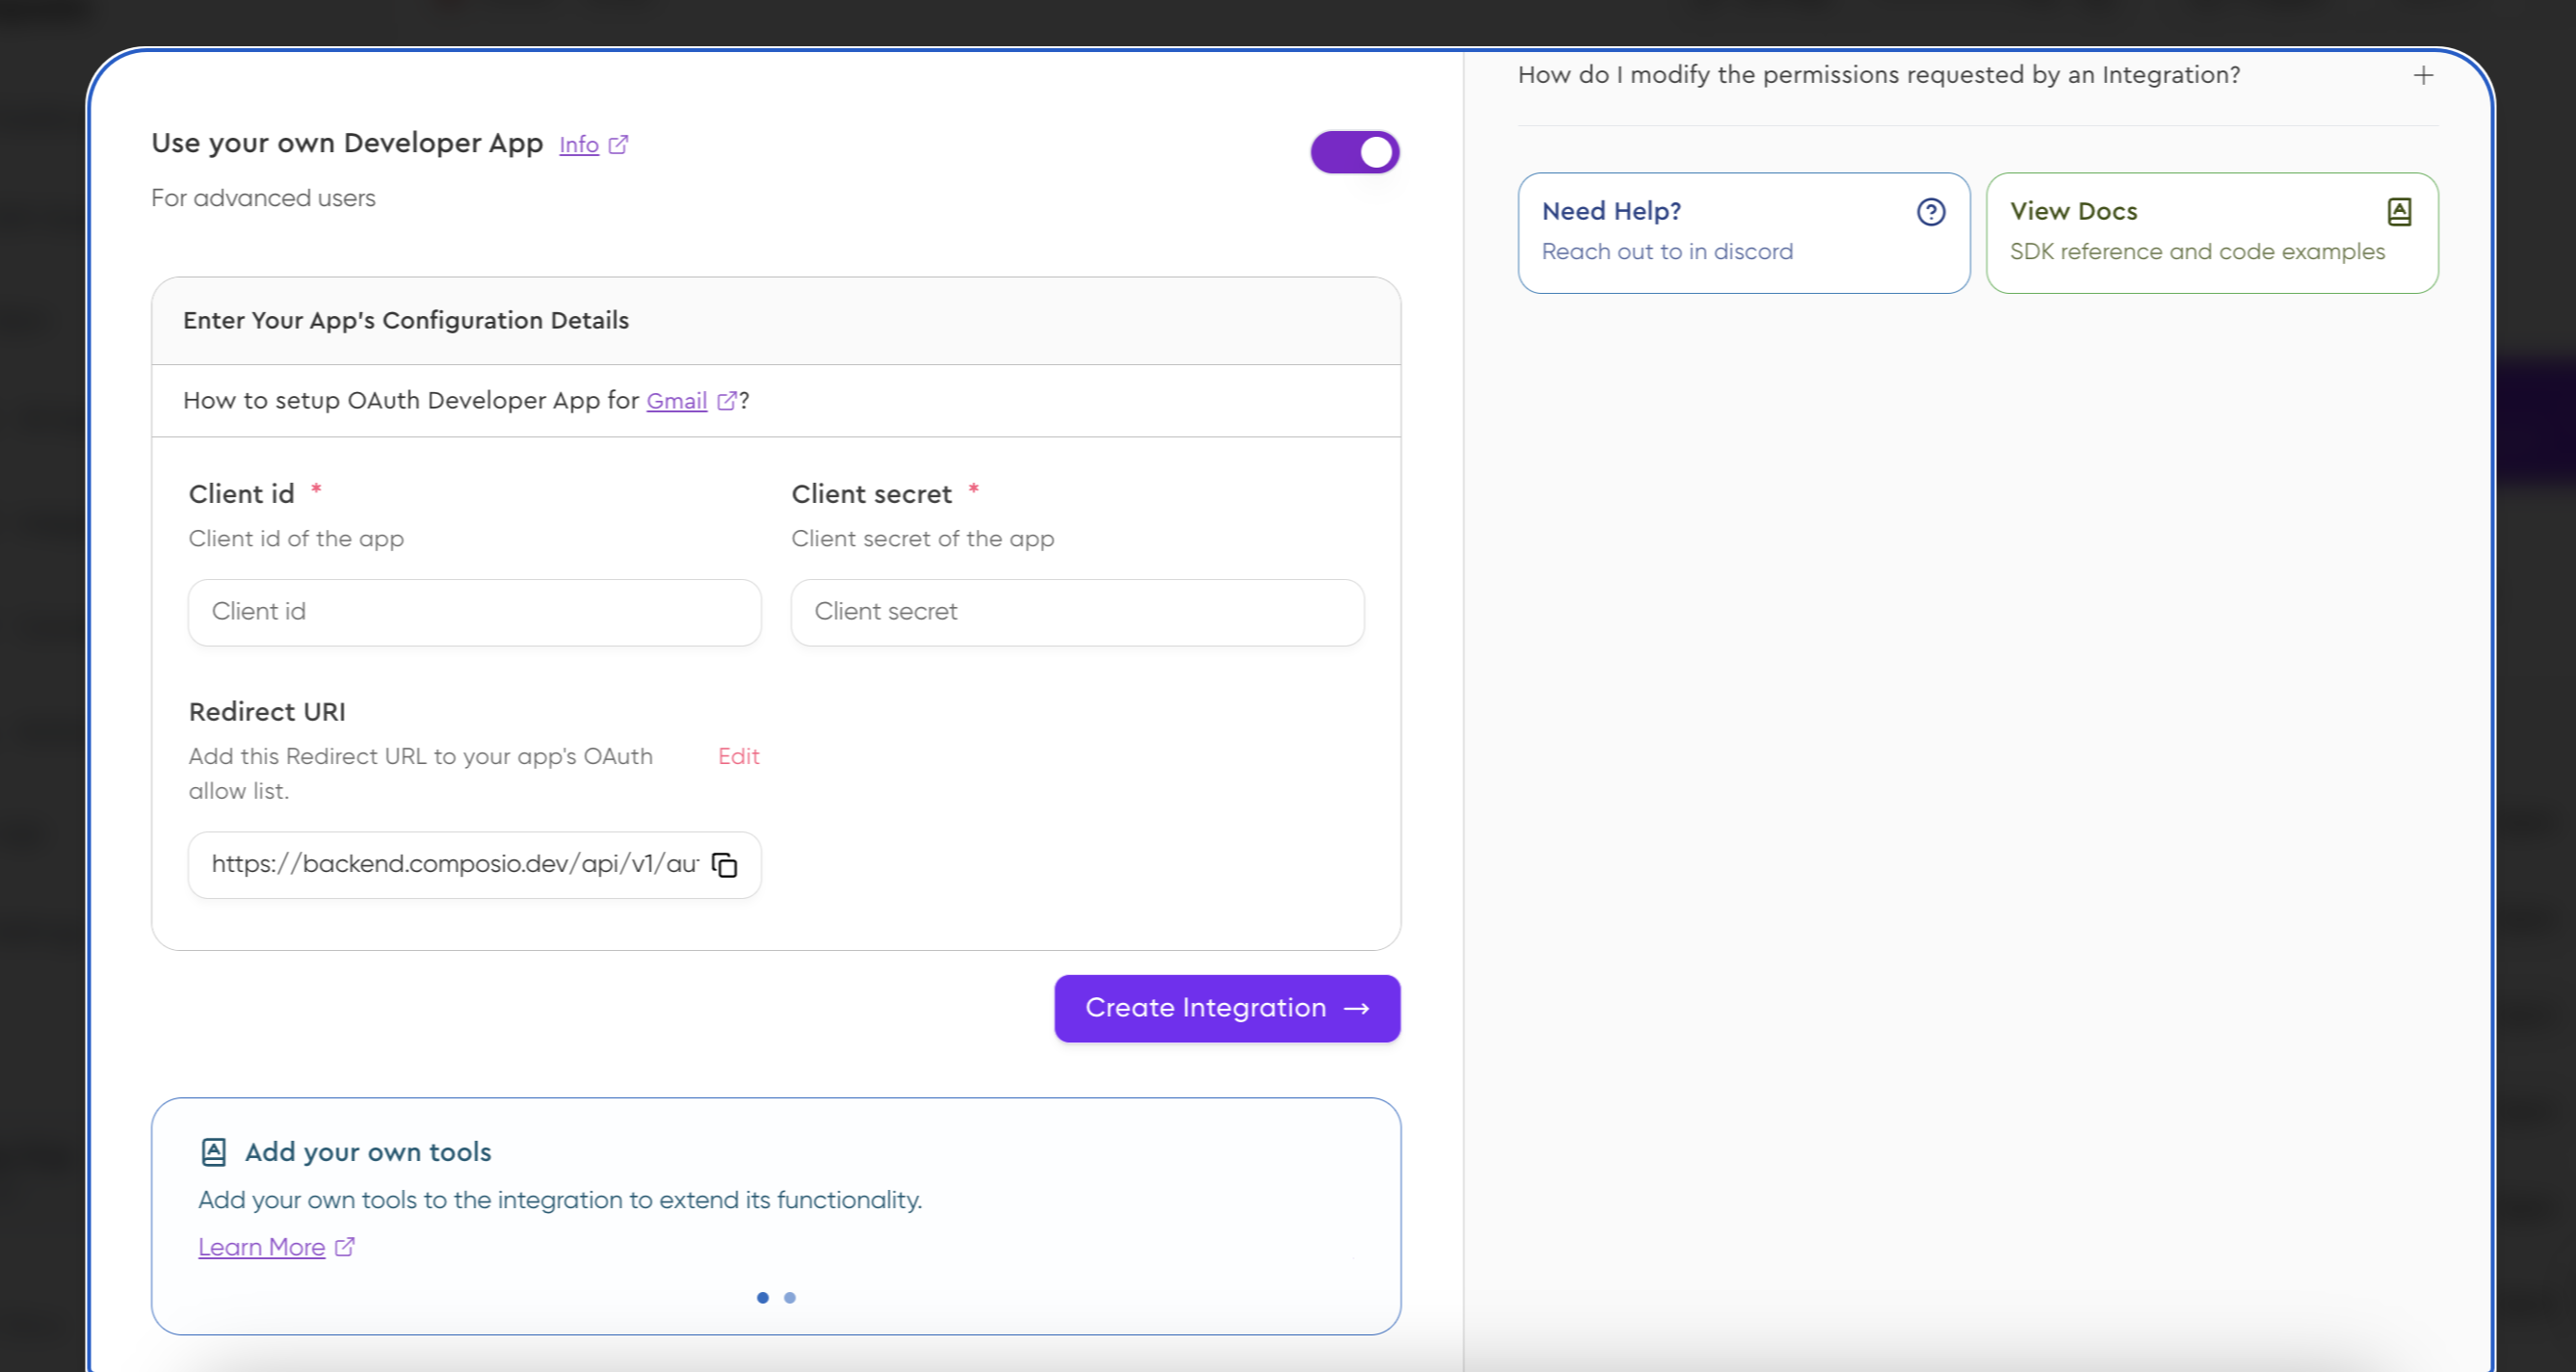
### Using Your Own OAuth Developer App
When creating an integration, you can use your own OAuth Developer App instead of Composio's default one, you can follow the same steps as mentioned in [Creating a New Integration](#creating-a-new-integration) and:
1. Enable the toggle "Use your own Developer App"
2. Enter your OAuth credentials:
* Client ID
* Client Secret
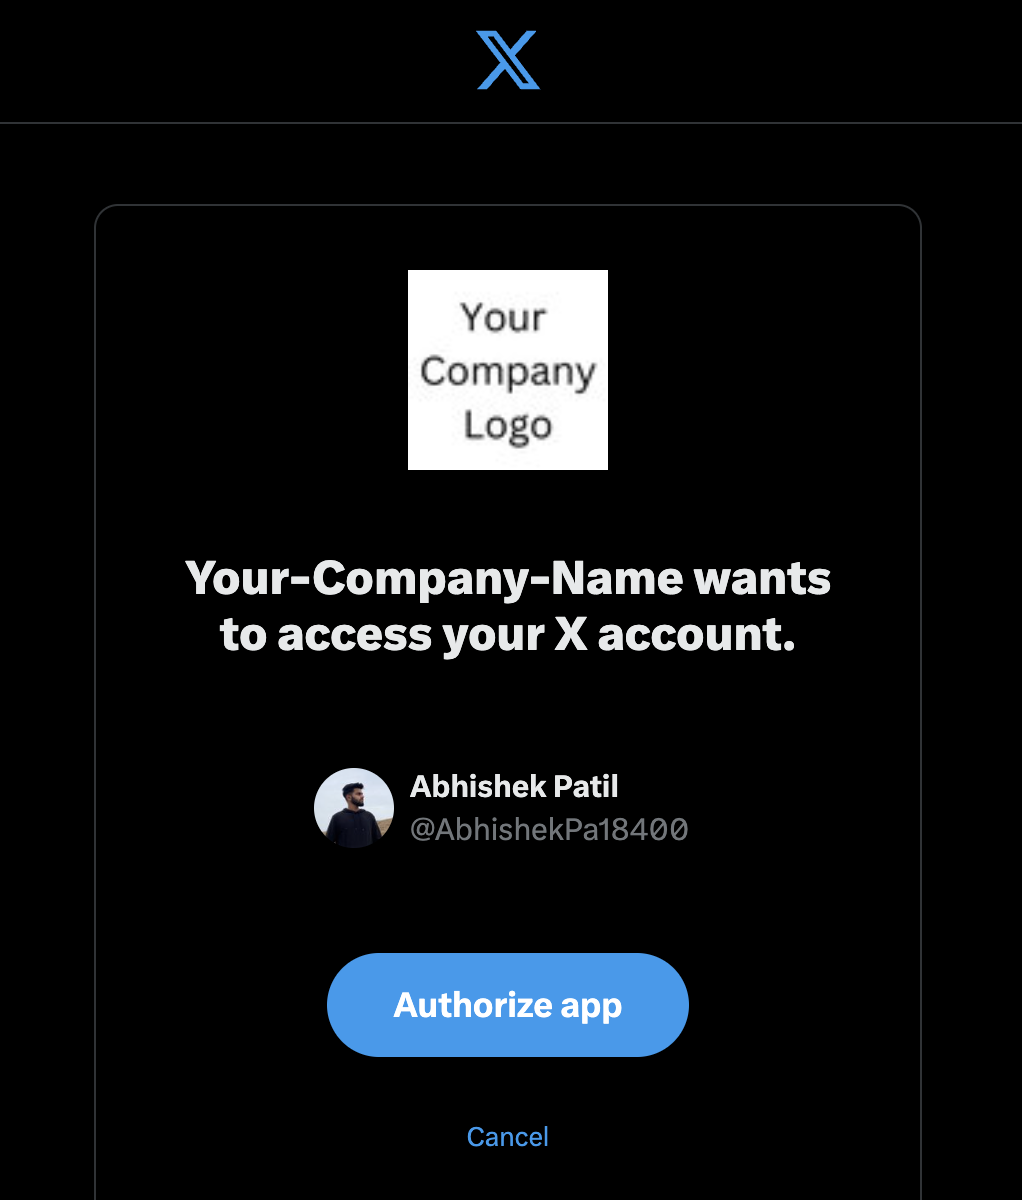
When users connect using this integration, they'll see your app's name and logo in the OAuth consent screen instead of Composio's. Checkout the live demo [here](https://whitelabel-eight.vercel.app/)
### Adding custom redirect URL
To use your own domain for OAuth callbacks, set up a 301 redirect from your domain to Composio's default redirect URL
. It would look something like this:
`yourdomain.com/redirect` → `https://backend.composio.dev/api/v1/auth-apps/add`
```bash Redirect URL
https://backend.composio.dev/api/v1/auth-apps/add
```
Head over to your DNS provider and set up a 301 redirect from your domain to Composio's default redirect URL, here are doc references for some of the popular DNS providers: [Cloudflare](https://developers.cloudflare.com/rules/url-forwarding/single-redirects/create-dashboard/), [GoDaddy](https://www.godaddy.com/en-in/help/forward-my-godaddy-domain-12123), [NameCheap](https://www.namecheap.com/support/knowledgebase/article.aspx/385/2237/how-to-set-up-a-url-redirect-for-a-domain/)
Please make sure that you enable the Preserve query string option when setting up the redirect. If you’re using your own custom application code for redirect, please remember to pass the exact query parameters and headers
Head over to [dashboard](https://app.composio.dev/), select the app you want to integrate and enable **Use your own Developer App** toggle, enter your OAuth credentials and click on the edit button and add your own redirect URL (yourdomain.com/redirect). Click on **Create Integration** and you're done.
 ### Adding custom redirect URL
To use your own domain for OAuth callbacks, set up a 301 redirect from your domain to Composio's default
### Adding custom redirect URL
To use your own domain for OAuth callbacks, set up a 301 redirect from your domain to Composio's default